Marching Tenor Drums
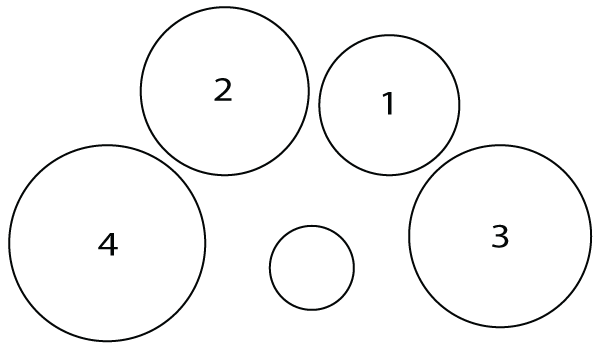
Tenor drums usually consist of 4-6 drums, having four main drums (usually some combination of 8", 10",12",13", or 14" drums) and sometimes 1 or 2 "spock", “gock” or accent drums which are usually 6”-8” in diameter. Tenors are played with sticks or mallets made of wood or aluminum shafts with heads made of wood, felt, rubber or nylon with cartwheel or ball shaped heads or specialty sticks.
Tenor drums are numbered 1 to 4 according to pitch. They are set up from left to right: drum 4, 2, 1, 3. This order allows the player to play descending and ascending using a simple alternate stickings.

Playing Area
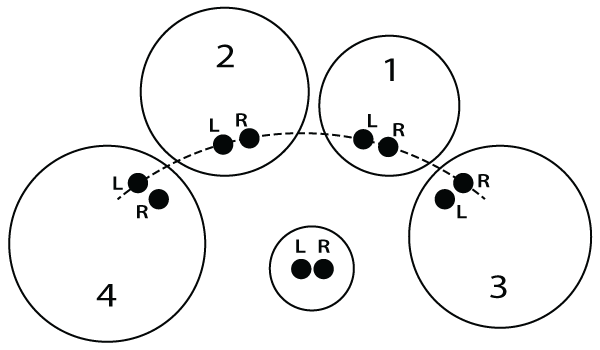
To play tenors effortlessly and to look relaxed you need to concentrate on the proper playing areas. The correct playing areas are 1-2" away from the bottom of the 1st and 2nd drums, the top-left corner of the 3rd drum and top-right corner of the 4th drum. This playing area has several advantages:
- Off-center playing allows the drum to resonate more, similar to Timpani. A full resonate sounds projects better on the field and helps cut through the ensemble.
- Playing "close-in" allows for easier playing, reducing the distances between the drums, making the instrument “smaller”.
Playing Zones
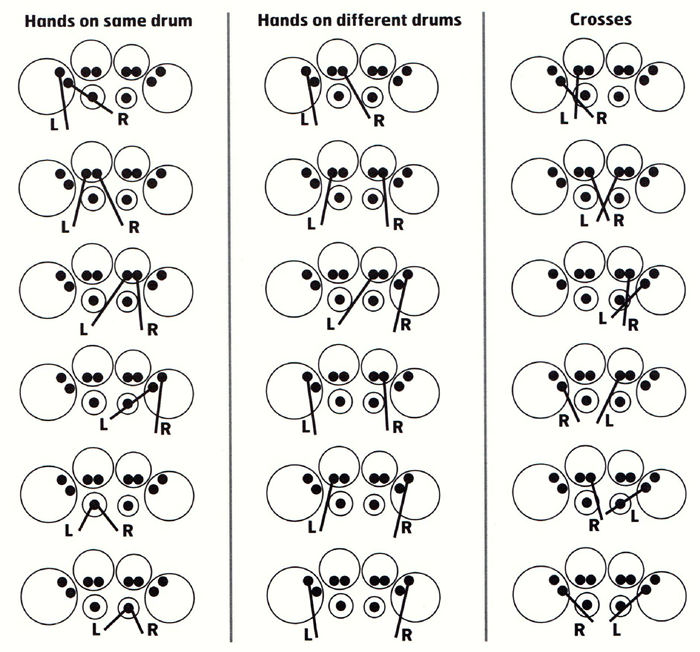
Playing zones are a very important part of creating a good sound on tenors. Each drum has a particular “target” for each particular stick to shoot for. This gives each stick the least amount of distance to travel in any given pattern around the drums. Refer to this general zone diagram to view different sticking scenarios. It’s very important to practice patterns around the drums SLOWLY, striving for accurate zones before increasing tempos.
Primary Playing Zones

Playing Zone Variations

Grip
Tenor players utilize Matched Grip. With this grip, both hands should grip the stick firmly (but without tension) at the fulcrum (the point where the thumb and forefinger/middle finger meet the stick) while keeping the back fingers loosely wrapped around the stick at all times. Position the stick resting on the crease of the 1st joint of the digits and all five fingers wrapped around the stick. There should be NO GAPS between the forefinger and the thumb, but there should also be NO TENSION. Simply keep the thumb in contact with the first finger. The top of your hand should not be flat, nor should your thumb be facing straight upward. The proper hand angle should be slightly less than 45 degrees. The stick should be in contact with the fingers and the palm of the hand as much as possible without "choking off" the natural motion of the stick. There is a slight upward bend to the wrist so that the stick does not approach the drum "flat".
When striking the drum, utilize a bend at the wrist. Do not drop your fingers (fly out) to gain height. Do not confuse keeping your fingers on the stick and the stick in the palm of your hand with overpowering the stroke and playing with a "choked off" sound. Your hand should feel relaxed at all times while utilizing the natural rebound from the head.
The shoulder and upper body should be completely relaxed. Be careful not to raise or “shrug” your shoulders at any time. The upper arm should protrude from the body at about a 45º angle keeping the elbow out and away (but relaxed) from the body
Set Position
The set position is one of the most important yet underrated parts of playing in a marching drumline. It is the first position the audience will see you in. For tenor drummers, set position is right stick in front of left. Keep the hands on the sticks/mallets the same as when playing so that the right stick is front of both the left mallet and left fingers. The sticks should be in perfect alignment with each other, centered to your body and the tenor drums and level to the ground.
Playing the Drums
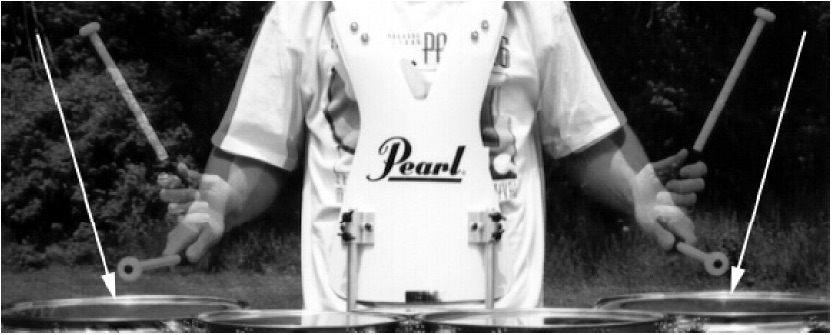
Sticks/Mallets should be at a 90º angle to each other with the beads of the sticks meeting approximately within a 2" circle. Stick motion should always be straight up and down. The "sticks out" position is when the sticks are ready to play but are not actually playing. The sticks should hover with the beads about 1 inch above the head on drum 1. When a single hand is playing, the free hand should rest in the sticks out position in a controlled manner. Don't allow the free hand to "wander".
Taps - Taps are defined as almost every ordinary note played. Depending on the musical passage being played, taps should be played at a height of about 3". After a single tap, the stick should return to the sticks out position, with the bead hovering 1" over the head.
Accents - Accents are generally played at about 9". More physical energy is required to play in time while increasing the distance of the stick motion. This increase in energy produces the increased volume of the stroke, thereby producing an accent. After a single accent, the stick should return to the sticks out position, with the bead hovering 1" over the head.
Rim Shots - Rim shots are special effect sounds produced by simultaneously striking the head and rim at the same time. The most common method is to strike the rim with the mallet about 4" from the end of the stick or mallet.
Diddles - A diddle is a controlled, double bounce produced with a single stroke. Make the primary stroke with your wrist, and the secondary "bounce" with your fingers, pulling your fingers close to the palm of your hand.
Stick Heights and Dynamics
Stick Heights
In order to produce a "clean" ensemble sound, all drummers have to be playing at the same heights. A height is usually referred to as the height your stick over the head in taps as well as accents. Play taps at around 3"-6” and accents around 9"-12”. Check your stick heights visually, seeing the bead of the stick at the top of the "blur" as you play.
Make sure that right hand stick height and left hand stick height is the same. Differing stick heights affect both volume and speed of the note and are the primary cause of uneven sounds.
Dynamics
Stick heights affect the velocity and thereby the dynamic level of the stroke. Use the following guide as a starting point for determining stick height in relation to dynamic markings. These will be further defined or modified in rehearsals.
Pianissimo – 1”
Piano – 3”
Mezzo Piano – 6”
Mezzo Forte – 9”
Forte – 12”
Fortissimo – 15”
Posture
Have your back straight, your chin up, and your snare drum parallel to the ground unless a visual calls for your snare to drop below or rise above level. Try playing your parts in front of a large mirror to check your posture. Your upper body, neck and shoulders should remain completely relaxed, no matter how demanding the playing may be. It is easy to become tense as the playing gets harder or faster, but this tension will only slow you down. Keep the motion of playing in the wrists and fingers.
Because the drums are set up 4, 2, 1, 3, the left side of the instrument will be slightly heavier. Players should compensate to keep the instrument level at all times. This is simply a matter of being aware of this fact and not allowing the left side of the set-up to sag.
Scrapes or Sweeps
*Scrapes are one of the best reasons to play quads. Also commonly referred to as "sweeps," scrapes are defined as diddles that are played on two different drums, the first beat of the diddle on any one drum, and the second beat on a different drum. Musically, scrapes can offer new effects through new drum-to-drum combinations; logistically, they can help move hands "out of the way," to make certain drum-to-drum combinations flow better.
The hand motions used when scraping diddles are no different than they are when playing diddles on one drum. All diddles should be played as two consecutive controlled legato strokes on a hand, using a combination of wrist, fingers, and at fast tempos, forearms.
There are really only two types of scrapes: those scraping outward, away from the center of the body, and those scraping inward, towards the center of the body. There are no special considerations needed for playing outward scrapes. When playing INWARD scrapes, however, it's helpful to turn your hands up a little so that the mallet downstrokes toward the first drum at an angle. The faster the tempo/lower the mallet height, the shallower the angle of the initial downstroke. Although the hands themselves are turned up a little, the hand motion doesn't change. DO NOT play inward scrapes with a "French Grip;" the fulcrum must still be located where the player can control the stick/mallet's side-to-side motion and his/her fingers can control both beats of each diddle.

When playing scrapes, it is imperative not to just "go with the flow" of the forearm's motions; one must know exactly where each beat of each scrape is contacting the drums. For ease of movement and conservation of motion, be sure to play in the "scrape playing areas" (as shown in chapter 5 on set positions/playing areas). It is also sometimes helpful to think about the three gaps between the drums rather than the four drums themselves. Proper scrape technique can be summed up as this: the hands turn from the wrist and incorporate the use of fingers in order to play excellent quality diddles, while the forearms move the hands where they need to go around the drums. This is the key to playing scrapes with great sound quality.
* Excerpt from the "Scrapes" chapter from Bill Bachman's book,Quad Logic
Cross-overs
There are 3 basic kinds of cross-overs.
- Fulcrum to Fulcrum - this only happens when you are playing drums that are beside one another such as the 1 or the 2, 1 or the 3 and so on. You should make sure to cross only fulcrum and not shaft as to not inhibit the movement of the hand underneath the crossing hand.
- Wrist to Wrist - this crossover is when you are crossing over the 1 to 4 drums or the 2 to 3 drums. The wrists will be the point of crossing-over.
- Forearm to Forearm - this only happens once, when you cross over the 4 and 3 drums.
One thing to keep in mind when doing crossovers is to keep the auxiliary hand (the hand under the crossing hand) low to the drum. This will ensure that you won't bump hands or sticks.
Instrument Care
Resting Instrument
If possible, keep the instrument on its carrier and rest the carrier on the ground, keeping the drums from making contact with the ground. Otherwise, carefully sit the instrument upright, resting on the two lowest drums. Extra care should be taken to sit the instrument on a clean, dry place and to avoid dirt at all costs. Inspect the drum bottom, sides, rims and lugs and clean carefully. Avoid sliding the instrument, even slightly, across concrete or other abrasive surfaces.
Drum Heads
Tenor drum heads are made of two plastic films, locked into a metal collar. These heads are durable, but can break, pull out of the metal collars and eventually wear out. Care should be taken to prevent cuts or scratched and the drums should only be played with mallets or drums sticks and should never be hit with anything sharp.
Mechanical parts
Lugs: Lugs maintain the tension on the drum heads. When the lugs become loose, the tuning of the head is affected. Lugs must be inspected to assure that proper tension is maintained.
Lubrication: All mechanisms must be properly lubricated to function properly. Lubrication is best applied with simple oil.
Dirt: Dirt can easily get into mechanical parts. Dirt is abrasive and can cause parts to wear out quickly. All dirt or sand must be cleaned off of every part of the drum.
Cleaning the instrument
Before each performance, each drum should be thoroughly cleaned to remove fingerprints from all metal parts. Also, blow out any dust or tape fragments that may accumulate between the rim and the edge of the drum head.
